Introduction
Let’s start with the basics: Mouse input is more complicated than you think.
Have you ever wondered why looking around feels so different between games? it is mostly because of how mouse input is handled. One may be tempted to think is a trivial issue, you just ask the mouse for the information you need and you are done. However, once we start to dig a bit deeper we can see how is more complicated than that. For example, how often are we asking for the information? A common mistake is to ask for it every frame. If you do this, you are asking for the last mouse event in that frame without having into account the actual motion of the mouse between them. This will produce jittery and unreliable input that will translate into jittery and unreliable controls.
Most game engines hide all of this complex behavior and offer a simplified way of using the mouse. For example, the Unity documentation contains the following quote:
If you are using input for any kind of movement behaviour use
Input.GetAxis. It gives you smoothed and configurable input that can be mapped to a keyboard, joystick or mouse.
Unity input documentation
So that’s it! Problem solved, Right?. Well… Kind of. While this make things easier, it also implies that you have no control over how the mouse responds in your game, specially if you don’t have access to the source code to take a peek of how things work under the hood.
But I know you came here for Godot, so let’s talk about how Godot handles this:
It doesn’t.
The Godot approach
Godot has a really powerful input system which works via input events and an input singleton in conjunction with an input map. The latter allow us to create custom actions assigned to specific keys, joypad buttons, and joysticks. However, you can not use the input map to handle mouse input. Because Godot is a general purpose engine and this is such an specific topic, there is no consensus yet about how it could be implemented in a transparent way that satisfy all users. As a result, you are expected to handle this yourself in the way that better fits your project. Luckily Godot provides all that is needed to implement it, but it implies a little more care and understanding about how events work in first place.
The pieces
The first thing to have in mind is that there is no specific issue to blame, the problem is a combination of elements that we must understand in order to achieve our goal.
Next i will cover the 5 main elements that we will be working with in order to achieve a better mouse control. Although some of you will be familiar with them already, I will try to give context and information that you may find useful.
Tip: Because of technical limitations I am forced to use spaces instead of tabs for the code snippets. If you want to save yourself some time here is a spaces to tabs converter. I’ll be using 4 spaces per tab.
Input accumulation
Processing input events can become quite expensive if they are not handled carefully. Because of this, similar input events are accumulated by default and processed at the end of each frame, limiting the amount of input calls to the current fps and deteriorating the quality of the response. While this improves performance and will present no issues for most use cases, we can disable it in order to get the most out of the input system.
Input accumulation can be disabled to get slightly more precise/reactive input at the cost of increased CPU usage. In applications where drawing freehand lines is required, input accumulation should generally be disabled while the user is drawing the line to get results that closely follow the actual input.
Note: Input accumulation is enabled by default.
Godot input documentation
event.relative
Each type of event has it’s own properties. In this particular case we are going be working with event.relative, which is a property of InputEventMouseMotion. This is the property you are supposed to use for mouse control and it’s documentation read as follows:
The mouse position relative to the previous position (position at the last frame).
Godot InputEventMouseMotion documentation
Is pretty short and does not explain much about it’s intended use, but it seems to imply that this property represents the travel of the mouse from one frame to another, which has lead many users, specially new ones, to do something like this:
Incorrect
1
2
3
4
5
6
7
8
9
10
11
12
13
var mouse_input: Vector2


func _unhandled_input(event)-> void:
    if event is InputEventMouseMotion:
        mouse_input = event.relative


func _process(delta)-> void:

    print(mouse_input)

    mouse_input = Vector2.ZERO
The problem is that the event.relative property contains the relative position of the mouse relative to the last frame only if input accumulation is enabled, otherwise multiple input calls can happen in a single frame. This means that we must add the new event.relative value to our mouse input instead of assigning it directly. This guarantees that it works as expected independently of the number of calls per frame.
Correct
1
2
3
4
5
6
7
8
9
10
11
12
13
var mouse_input: Vector2


func _unhandled_input(event)-> void:
    if event is InputEventMouseMotion:
        mouse_input += event.relative


func _process(delta)-> void:

    print(mouse_input)

    mouse_input = Vector2.ZERO
Note: We set mouse_input to Vector2.ZERO because if there is no mouse movement no event will be sent and the input will never be (0, 0). Because _physics_process() is called before _process(), you can still safely use mouse_input inside of _physics_process().
Raw input
Godot will automatically use raw mouse data under Linux and Windows when the mouse mode is set to captured, which is the reason your sensitivity and precision change when you capture the mouse, as it will no longer be affected by your operating system settings.
Events are stretched too
Mouse events use viewport coordinates and will be affected by your Stretch settings. This guarantees that mechanics such as clicking buttons, drag and drop, or making a character looks towards the mouse works as expected.
Let’s say that the game viewport size is 1280x720, the window size is 1920x1080, stretch mode is set to viewport, and stretch scale to 0.25. If the events were not stretched accordingly there would be issues like discrepancies between where you wanted to click and where you actually clicked, however, this is a problem if we want to use the mouse as a controller, because we need the input to be constant regardless of the window size or scaling.
A quick online search about how to fix this unstability and you will stumble mostly upon people making the same question who never got an answer, and the the few ones who got them were suggested solutions that may seem to minimize the problem but will not get rid of it completely, neither address the root cause. So let’s clear this up once and for all.
The events are being stretched by the same factors that affect the main window. We could try to manually compensate for each factor, but we are not going to do that.
Our main window inherits from the viewport class, which has the get_final_transform() method. As the name implies, this is the final transform of the viewport in reference to it’s original transform. If the viewport and window size match perfectly, the transform reported will be [X: (1, 0), Y: (0, 1), O: (0, 0)], if we double the window size, it will report [X: (2, 0), Y: (0, 2), O: (0, 0)], and finally, if we set the scale to 0.75 it will be [X: (1.5, 0), Y: (0, 1.5), O: (0, 0)].
As you may suspect by this point, applying this transform to the events will effectively cancel any stretching that may be happening to them, and consequently to our event.relative values. We can do that using the xformed_by() method of the InputEvent class. Using the example shown in event.relative implementing the fix would go as follows:
1
2
3
4
5
6
7
8
9
10
11
12
13
14
var mouse_input: Vector2


func _unhandled_input(event)-> void:
    if event is InputEventMouseMotion:
        var viewport_transform: Transform2D = get_tree().root.get_final_transform()
        mouse_input += event.xformed_by(viewport_transform).relative


func _process(delta)-> void:

    print(mouse_input)

    mouse_input = Vector2.ZERO
If you play with different window sizes, stretch modes and scaling factors you will see how your mouse input remains perfectly constant.
warning: Contrary to what one could expect, even the raw mouse input provided in captured mode is affected by this, because again, there is no consensus about it.
Never use delta time
Really. I mean it. Your mouse motion is frame independent already! Your mouse works by sending packages of data as events every time it moves and the combination of those events results in your mouse motion. We already know what happened between frames, we do not need to estimate it using delta.
Not only that, because the mouse motion is frame independent already, multiplying it by delta will make it frame rate dependent! By trying to fix a problem that does not exist, you are creating the problem your were trying to fix.
Solving the puzzle
At this point you can see that I was not lying when I said that there is no specific issue to blame. All the elements that we have covered affects your mouse input, sometimes in unexpected ways, but now that we have a good understanding about the pieces involved and their context it’s time to solve the puzzle!
We are going to put all of this in practice creating a first person camera controller. We are going for the best we can get, so is going to have a performance cost. This are our goals:
- It must be as responsive as it can.
- It must use raw input.
- Sensitivity must be stretch and scale independent.
- Sensitivity must be frame rate independent.
- The node’s transforms must not deteriorate over time.
We will create the necessary scenes first and then continue with the scripting.
Tip: You can find the full project on the downloads category under my profile.
Scenes
Character scene
The character scene is as simple as it can get:
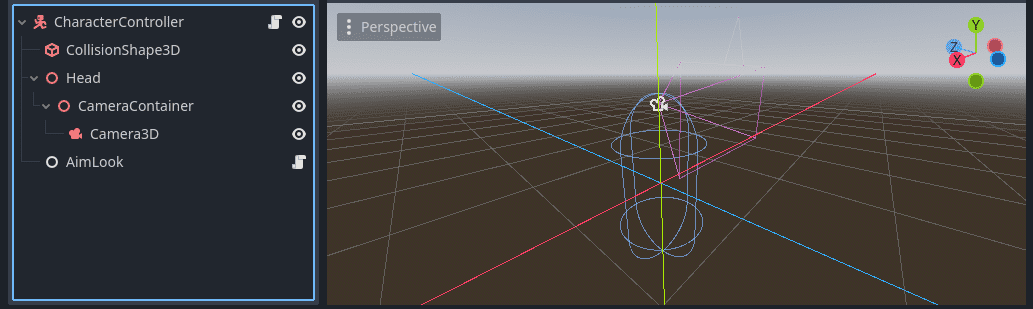
- Create a new scene and click on
Other node. - Select
CharacterBody3Das root node and rename it toCharacterController. - Add a
CollisionShape3Das a child ofCharacterController. - Click on
CollisionShape3Dand set it’sshapetoCapsuleShape3Dwith default values. - Add a
Node3Das a child ofCharacterController, name itHeadand set it’s position to(0, 0.75, 0). - Add a
Node3Das a child ofHeadand rename itCameraContainer. - add a
Camera3Das a child ofCameraContainer. - Add a
Nodeas a child ofCharacterControllerand rename it toAimLook. - Save the scene as
character_controller.
Test scene
You can use any scene you want for testing, but in case you want to follow this article to the letter, here is the scene I will be using:
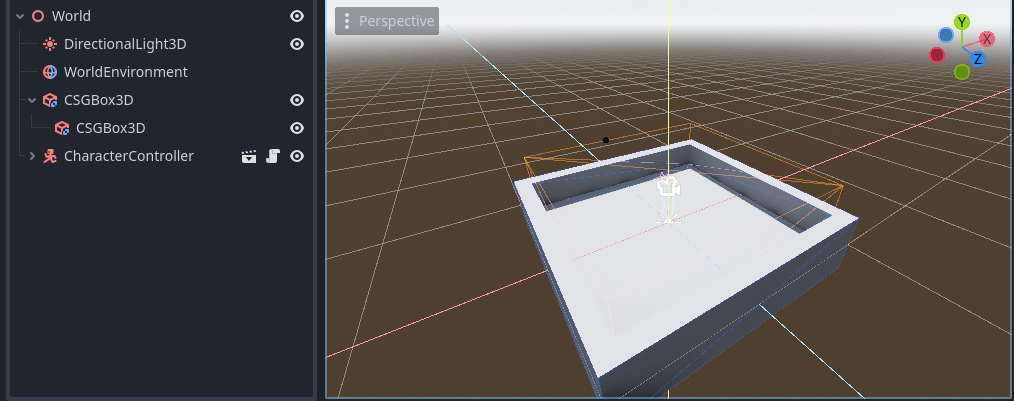
- Create a new scene and click on
3D Scene. - Rename the root node to
World. - Click on the 3 dots next to the sun and environment preview icons and apply them clicking on
Add Sun to SceneandAdd Environment to Scene.
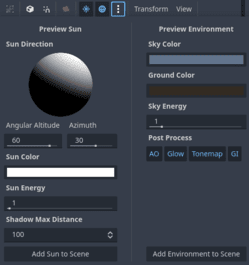 Sun and Environment settings.
- Add a
CSGBox3Dand checkUse collision. Set it’s size to(16, 4, 16). - Add another
CSGBox3Das a child of the first one and set the operation toSubstaction. Set it’s size to(14, 4, 14)and it’s position to(0, 2, 0). - Add the
character_controllerscene and set it’s position to(0, 1 ,0)so it rest perfectly on the floor. - save the scene as
test_scene. - Run the project and select
Select Currentwhen asked for a default scene to run.
Scripting
Node exports
I personally don’t like direct references in my code. They are easy to break either because your renamed a node or changed it’s position on the hierarchy. Once you make a direct reference, your code is tightly coupled and your scene tree locked. Fortunately for us there is a better way of doing it: @export annotations.
Add the following script to the AimLook node inside the character_controller scene and save it as aim_look.gd:
1
2
3
4
5
6
7
8
9
10
extends Node

#nodes
@export_group("Nodes")

#Character node.
@export var character: CharacterBody3D

#Head node.
@export var head: Node3D
@export_group("Nodes") will export a group to the editor called “Nodes”. Any @export declared after it will be contained inside the group until a new group is declared.
Note: You can also end a group by declaring a new one with empty strings as parameters.
@export allow us to export a variable to the editor. For it to work we must declare the variable type. If that type happens to be a class that inherits from Node (such as CharacterBody3D), we will be able to assign nodes of that class (And the ones who inherit from it) directly from the editor. It will also keep track of the assigned node, so moving the nodes around in the hierarchy will not break the reference.
Tip: There are several different types of exports that cover a wide range of functionalities. You can learn more about the @export annotations here.
If you click on the AimLook node and go the Inspector panel, you will see a new foldable group called “Nodes” who contains our two variables with a field to assign a node. Drag and drop the CharacterBody3D and head nodes to their corresponding fields or click on each field and select the nodes from the list.
Mouse capture
The MouseMode determines how the cursor behaves. In this case, we are interested in two of them:
MOUSE_MODE_VISIBLEis the default mode and will not interfere at all with the cursor.MOUSE_MODE_CAPTUREDwill hide the cursor and keep it centered on the window. It also provides raw mouse input. This is the usual behavior in most first person games.
We are going to work with _unhandled_input() instead of _input(). The difference between them is that, while _input() will be called every time an event is received, _unhandled_input() will be called only if those events has not been consumed already. This is useful in order to prevent capturing the mouse if you click on a 2D element such as a menu or a text box.
To capture the mouse we just check if the event class is InputEventMouseButton. If it is, we check if the button_index is 1, which is assigned to the left mouse button, and change the MouseMode to MOUSE_MODE_CAPTURED.
1
2
3
4
5
6
7
8
9
10
11
12
13
14
15
extends Node

#nodes
@export_group("Nodes")

#Character node.
@export var character: CharacterBody3D

#Head node.
@export var head: Node3D

func _unhandled_input(event)-> void:
    if event is InputEventMouseButton:
        if event.button_index == 1:
            Input.set_mouse_mode(Input.MOUSE_MODE_CAPTURED)
Releasing the mouse is the same process. check if the event class is InputEventKey and if it is, check if we pressed the built it action ui_cancel (escape key by default) and set the MouseMode to MOUSE_MODE_VISIBLE.
1
2
3
4
5
6
7
8
9
10
11
12
13
14
15
16
17
18
19
20
21
extends Node

#nodes
@export_group("Nodes")

#Character node.
@export var character: CharacterBody3D

#Head node.
@export var head: Node3D

func _unhandled_input(event)-> void:
    if event is InputEventMouseButton:
        if event.button_index == 1:
            Input.set_mouse_mode(Input.MOUSE_MODE_CAPTURED)

        return

    if event is InputEventKey:
        if event.is_action_pressed("ui_cancel"):
            Input.set_mouse_mode(Input.MOUSE_MODE_VISIBLE)
Tip: Because processing input can be expensive, specially with mouse accumulation disabled, is a good idea to return from the _unhandled_input() function as soon as you can to save unnecessary checks and keep the code clean. In this case, once we have checked if the event class is InputEventMouseButton only two things can happen: Either is a left click and we should return, or is not and we should return anyway. Because the outcome is the same, we can save an extra line by just returning after whatever happened with the event.
Quitting the game
Lets say we want to add some quality of life improvements, such as closing the game instead of releasing the mouse if the mouse is already released, or look around only when the mouse is captured. Of course, your could add a few if and else statements and never look back. But that implies more code and more levels of indentation, which is not ideal.
If you think about what we are trying to do, we only care about capturing the mouse or quitting the game if the mouse is not captured already, so lets wrap that into an if statement who checks if the mouse is not captured. We don’t need to return from the quit game check because well, it will quit the game. We do not need to return from the capture mouse check either because is the last check inside our if Input.mouse_mode != Input.MOUSE_MODE_CAPTURED: statement. We will always return from that statement, because if the mouse is not captured we do not want to do anything more. Now we can assume that whatever happens after that statement happens with the mouse captured, which is ideal to do our release mouse check.
1
2
3
4
5
6
7
8
9
10
11
12
13
14
15
16
17
18
19
20
21
22
23
24
25
26
extends Node

#nodes
@export_group("Nodes")

#Character node.
@export var character: CharacterBody3D

#Head node.
@export var head: Node3D

func _unhandled_input(event)-> void:
    if Input.mouse_mode != Input.MOUSE_MODE_CAPTURED:
        if event is InputEventKey:
            if event.is_action_pressed("ui_cancel"):
                get_tree().quit()

        if event is InputEventMouseButton:
            if event.button_index == 1:
                Input.set_mouse_mode(Input.MOUSE_MODE_CAPTURED)

        return

    if event is InputEventKey:
        if event.is_action_pressed("ui_cancel"):
            Input.set_mouse_mode(Input.MOUSE_MODE_VISIBLE)
Look at that! The code is clean and efficient and it’s functionality is clear… and not a single else to be found!
Disabling input accumulation
As we have discussed already, input accumulation must be disabled in order to get more responsive input. Depending on the mouse poll rate and assuming Godot is able to process all the events this could translate into thousands of calls per second. That’s why disabling input accumulation can become so expensive.
That said, disabling it is pretty easy. One line inside the _ready() function will do the work.
1
2
3
4
5
6
7
8
9
10
11
12
13
14
15
16
17
18
19
20
21
22
23
24
25
26
27
28
29
30
extends Node

#nodes
@export_group("Nodes")

#Character node.
@export var character: CharacterBody3D

#Head node.
@export var head: Node3D

func _ready():
    Input.set_use_accumulated_input(false)


func _unhandled_input(event)-> void:
    if Input.mouse_mode != Input.MOUSE_MODE_CAPTURED:
        if event is InputEventKey:
            if event.is_action_pressed("ui_cancel"):
                get_tree().quit()

        if event is InputEventMouseButton:
            if event.button_index == 1:
                Input.set_mouse_mode(Input.MOUSE_MODE_CAPTURED)

        return

    if event is InputEventKey:
        if event.is_action_pressed("ui_cancel"):
            Input.set_mouse_mode(Input.MOUSE_MODE_VISIBLE)
Yaw and Pitch
Create two methods to add yaw and pitch named add_yaw() and add_pitch(). Both will rotate a node by a given amount specified in degrees and orthonormalize it to prevent it’s transform from deteriorating, the only difference between them is the node they rotate and the axis in which they do it.
In order to prevent gimbal lock the whole CharacterController node is rotated to perform yaw and the Head node will take care of the pitch.
1
2
3
4
5
6
7
8
9
10
11
12
13
14
15
16
17
18
19
20
21
22
23
24
25
26
27
28
29
30
31
32
33
34
35
36
37
38
39
40
41
42
43
44
45
46
47
48
49
extends Node

#nodes
@export_group("Nodes")

#Character root node.
@export var character : CharacterBody3D

#Head node.
@export var head : Node3D


func _ready():
    Input.set_use_accumulated_input(false)


func _unhandled_input(event)->void:
    if Input.mouse_mode != Input.MOUSE_MODE_CAPTURED:
        if event is InputEventKey:
            if event.is_action_pressed("ui_cancel"):
                    get_tree().quit()

        if event is InputEventMouseButton:
            if event.button_index == 1:
                Input.set_mouse_mode(Input.MOUSE_MODE_CAPTURED)

        return

    if event is InputEventKey:
            if event.is_action_pressed("ui_cancel"):
                Input.set_mouse_mode(Input.MOUSE_MODE_VISIBLE)


#Rotates the character around the local Y axis by a given amount (In degrees) to achieve yaw.
func add_yaw(amount)->void:
    if is_zero_approx(amount):
        return

    character.rotate_object_local(Vector3.DOWN, deg_to_rad(amount))
    character.orthonormalize()


#Rotates the head around the local x axis by a given amount (In degrees) to achieve pitch.
func add_pitch(amount)->void:
    if is_zero_approx(amount):
        return

    head.rotate_object_local(Vector3.LEFT, deg_to_rad(amount))
    head.orthonormalize()
Pitch clamp
We are going to need an extra method called clamp_pitch() to clamp our head node local x rotation between our desired minimum and maximum pitch. We will export those values to the editor for convenience and place them inside a subgroup called Clamp settings under a group called Settings.
1
2
3
4
5
6
7
8
9
10
11
12
13
14
15
16
17
18
19
20
21
22
23
24
25
26
27
28
29
30
31
32
33
34
35
36
37
38
39
40
41
42
43
44
45
46
47
48
49
50
51
52
53
54
55
56
57
58
59
60
61
62
63
64
65
66
67
68
69
70
extends Node

#Nodes.
@export_group("Nodes")

#Character root node.
@export var character : CharacterBody3D

#Head node.
@export var head : Node3D

#Settings.
@export_group("Settings")

#pitch clamp settings.
@export_subgroup("Clamp settings")

#max pitch in degrees.
@export var max_pitch : float = 89

#min pitch in degrees.
@export var min_pitch : float = -89


func _ready():
    Input.set_use_accumulated_input(false)


func _unhandled_input(event)->void:
    if Input.mouse_mode != Input.MOUSE_MODE_CAPTURED:
        if event is InputEventKey:
            if event.is_action_pressed("ui_cancel"):
                get_tree().quit()

        if event is InputEventMouseButton:
            if event.button_index == 1:
                Input.set_mouse_mode(Input.MOUSE_MODE_CAPTURED)

        return

    if event is InputEventKey:
        if event.is_action_pressed("ui_cancel"):
            Input.set_mouse_mode(Input.MOUSE_MODE_VISIBLE)


#Rotates the character around the local Y axis by a given amount (In degrees) to achieve yaw.
func add_yaw(amount)->void:
    if is_zero_approx(amount):
        return

    character.rotate_object_local(Vector3.DOWN, deg_to_rad(amount))
    character.orthonormalize()


#Rotates the head around the local x axis by a given amount (In degrees) to achieve pitch.
func add_pitch(amount)->void:
    if is_zero_approx(amount):
        return

    head.rotate_object_local(Vector3.LEFT, deg_to_rad(amount))
    head.orthonormalize()


#Clamps the pitch between min_pitch and max_pitch.
func clamp_pitch()->void:
    if head.rotation.x > deg_to_rad(min_pitch) and head.rotation.x < deg_to_rad(max_pitch):
        return

    head.rotation.x = clamp(head.rotation.x, deg_to_rad(min_pitch), deg_to_rad(max_pitch))
    head.orthonormalize()
Note: Don’t forget to orthonormalize!
Aim look
Now we are ready to start looking around!

Export another subgroup called Mouse settings inside the Settings group that will contain a variable called mouse_sensitivity. This subgroup will be declared before the Clamp settings one to keep things organized.
We are going to use the @export_range annotation, which allow us to limit the range of the exported variable on the editor and the increment/decrement step. The type and range of this variable is up to you, but in my case mouse_sensitivity will be an int, the range will be 1 to 100 (in order to prevent a value of 0), the step will be 1, and the default value 50.
The aim_look() method will take an InputEventMouseMotion event as a parameter. Because we took care of creating methods for yaw, pitch, and clamping already, the content of the method is pretty straightforward. We assign the relative property of the event to a new local variable called motion that will be later multiplied by mouse_sensitivity. However, as we seen in Disabling input accumulation, most modern mouses have a high DPI, which means we will receive large values. This will force us to use really small values on the editor which is not ideal, specially since Godot only allows 3 decimals by default. To solve this, we are going to create another local variable named degrees_per_unit to multiply our motion with it. I chosen a value of 0.001, which is a 0.1% of a degree per unit, which happens to work pretty well with our scale of 0 to 100 using a mouse with 1000 DPI.
After that we just call our add_yaw(), add_pitch(), and clamp_pitch() methods and all that’s left to do is call the aim_look() method inside _unhandled_input() and pass it the corresponding event.
1
2
3
4
5
6
7
8
9
10
11
12
13
14
15
16
17
18
19
20
21
22
23
24
25
26
27
28
29
30
31
32
33
34
35
36
37
38
39
40
41
42
43
44
45
46
47
48
49
50
51
52
53
54
55
56
57
58
59
60
61
62
63
64
65
66
67
68
69
70
71
72
73
74
75
76
77
78
79
80
81
82
83
84
85
86
87
88
89
90
91
92
93
extends Node

#nodes
@export_group("Nodes")

#Character root node.
@export var character : CharacterBody3D

#Head node.
@export var head : Node3D

#Settings.
@export_group("Settings")

#Mouse settings.
@export_subgroup("Mouse settings")

#mouse sensitivity.
@export_range(1, 100, 1) var mouse_sensitivity: int = 50

#pitch clamp settings.
@export_subgroup("Clamp settings")

#max pitch in degrees.
@export var max_pitch : float = 89

#min pitch in degrees.
@export var min_pitch : float = -89

func _ready():
    Input.set_use_accumulated_input(false)


func _unhandled_input(event)->void:
    if Input.mouse_mode != Input.MOUSE_MODE_CAPTURED:
        if event is InputEventKey:
            if event.is_action_pressed("ui_cancel"):
                get_tree().quit()

        if event is InputEventMouseButton:
            if event.button_index == 1:
                Input.set_mouse_mode(Input.MOUSE_MODE_CAPTURED)

        return

    if event is InputEventKey:
        if event.is_action_pressed("ui_cancel"):
            Input.set_mouse_mode(Input.MOUSE_MODE_VISIBLE)

        return

    if event is InputEventMouseMotion:
        aim_look(event)


#Handles aim look with the mouse.
func aim_look(event: InputEventMouseMotion)-> void:
    var motion: Vector2 = event.relative
    var degrees_per_unit: float = 0.001

    motion *= mouse_sensitivity
    motion *= degrees_per_unit

    add_yaw(motion.x)
    add_pitch(motion.y)
    clamp_pitch()


#Rotates the character around the local Y axis by a given amount (In degrees) to achieve yaw.
func add_yaw(amount)->void:
    if is_zero_approx(amount):
        return

    character.rotate_object_local(Vector3.DOWN, deg_to_rad(amount))
    character.orthonormalize()


#Rotates the head around the local x axis by a given amount (In degrees) to achieve pitch.
func add_pitch(amount)->void:
    if is_zero_approx(amount):
        return

    head.rotate_object_local(Vector3.LEFT, deg_to_rad(amount))
    head.orthonormalize()


#Clamps the pitch between min_pitch and max_pitch.
func clamp_pitch()->void:
    if head.rotation.x > deg_to_rad(min_pitch) and head.rotation.x < deg_to_rad(max_pitch):
        return

    head.rotation.x = clamp(head.rotation.x, deg_to_rad(min_pitch), deg_to_rad(max_pitch))
    head.orthonormalize()
Stretching the input back
Finally, we are going to address one infamous issue present on lots of Godot games and official demos. If you are using scaling or any kind of window stretching, whatever it is canvas_items or viewport, the events are being stretched too in reference to the window original size and scale. In the best case scenario, the user scales the window causing the sensitivity of the mouse to change, in the worst case scenario you have set your stretch mode to ignore which results in different sensitivities for the x and y axis if the window is stretched by the user. I already gave a detailed explanation about why this happens and how to fix it, but all we need to remember right now is that transforming our events by the main window final transform will cancel all this undesired side effects.
To make things cleaner, we declare a new variable called viewport_transform who contains the current main window final transform and modify the motion variable to take it into account with the xformed_by() method.
1
2
3
4
5
6
7
8
9
10
11
12
13
14
15
16
17
18
19
20
21
22
23
24
25
26
27
28
29
30
31
32
33
34
35
36
37
38
39
40
41
42
43
44
45
46
47
48
49
50
51
52
53
54
55
56
57
58
59
60
61
62
63
64
65
66
67
68
69
70
71
72
73
74
75
76
77
78
79
80
81
82
83
84
85
86
87
88
89
90
91
92
93
94
95
extends Node

#nodes
@export_group("Nodes")

#Character root node.
@export var character : CharacterBody3D

#Head node.
@export var head : Node3D

#Settings.
@export_group("Settings")

#Mouse settings.
@export_subgroup("Mouse settings")

#mouse sensitivity.
@export_range(1, 100, 1) var mouse_sensitivity: int = 50

#pitch clamp settings.
@export_subgroup("Clamp settings")

#max pitch in degrees.
@export var max_pitch : float = 89

#min pitch in degrees.
@export var min_pitch : float = -89


func _ready():
    Input.set_use_accumulated_input(false)


func _unhandled_input(event)->void:
    if Input.mouse_mode != Input.MOUSE_MODE_CAPTURED:
        if event is InputEventKey:
            if event.is_action_pressed("ui_cancel"):
                get_tree().quit()

        if event is InputEventMouseButton:
            if event.button_index == 1:
                Input.set_mouse_mode(Input.MOUSE_MODE_CAPTURED)

        return

    if event is InputEventKey:
        if event.is_action_pressed("ui_cancel"):
            Input.set_mouse_mode(Input.MOUSE_MODE_VISIBLE)

        return

    if event is InputEventMouseMotion:
        aim_look(event)


#Handles aim look with the mouse.
func aim_look(event: InputEventMouseMotion)-> void:
    var viewport_transform: Transform2D = get_tree().root.get_final_transform()
    var motion: Vector2 = event.xformed_by(viewport_transform).relative
    var degrees_per_unit: float = 0.001

    motion *= mouse_sensitivity
    motion *= degrees_per_unit

    add_yaw(motion.x)
    add_pitch(motion.y)
    clamp_pitch()


#Rotates the character around the local Y axis by a given amount (In degrees) to achieve yaw.
func add_yaw(amount)->void:
    if is_zero_approx(amount):
        return

    character.rotate_object_local(Vector3.DOWN, deg_to_rad(amount))
    character.orthonormalize()


#Rotates the head around the local x axis by a given amount (In degrees) to achieve pitch.
func add_pitch(amount)->void:
    if is_zero_approx(amount):
        return

    head.rotate_object_local(Vector3.LEFT, deg_to_rad(amount))
    head.orthonormalize()


#Clamps the pitch between min_pitch and max_pitch.
func clamp_pitch()->void:
    if head.rotation.x > deg_to_rad(min_pitch) and head.rotation.x < deg_to_rad(max_pitch):
        return

    head.rotation.x = clamp(head.rotation.x, deg_to_rad(min_pitch), deg_to_rad(max_pitch))
    head.orthonormalize()
Final notes
Let’s be honest, that was a lot of text already and I have no intention of making it any longer. If I did my work well now you have a better understanding of how mouse input works in Godot and everything you need to put it in practice. The puzzle is solved… it is time to enjoy the view.
Any question or comments? Want to say hello? You can reach me on Mastodon.
If you found the content of this article useful, please consider supporting me on Ko-fi. As you can see, there are no adds or cookies on this site and I am totally committed with delivering high quality, free and open source assets and helping the Godot community grow. As such, my only income comes from donations.